2-5 minute read (including generated descriptions). Content warning: Technical challenges, use of automation and AI for design and transcription.
chatGPT Summary: Kay, on their 6th consecutive day of a streak, challenges themselves to expand their knowledge of Braille letters while also discovering new video editing tools in Adobe Premiere Pro that can assist with their unique needs.
Vancouver – Day three, part 2. I decided to post the video I made documenting the creation of my Braille cards yesterday. However, the challenge continues to be the exploration of automation tools. I have subscription access to Speechify, so I decided to type out the general synopsis of what happened in my video and see if I could generate a voice-over from the voiceover studio. It was intuitive, but the tools were hard to manage. The slider, which I was familiar with from using tools like Amara to generate captions, was finicky, and it refused to show me the actual length of my video, so I had to make guesses as I worked. When I was done, I could output the video with the voice-over embedded and, to my surprise, a caption file. The caption output was awful and didn’t follow any best practices. It is up to the user to know the 42/21 rule (42 characters/21 sections; for more information, check out the training tool I made with grunt gallery in 2021 on non-auditory access) and then to guess how long each caption frame lasts. I couldn’t be bothered within Amara, and I dropped the video with voice-over into my otter.ai tool, producing a useful caption file.

I was frustrated that there was no all-in-one solution. In the end, I have lots of experience making open caption files, so I dropped everything into Adobe, cleaned up the captions manually and output the final file from there. If you counted the original video from my iPhone and the .mov to .mp4 converter, I ended up using five different programs – two of which are considered limited AI.
I figure it isn’t long until this is all available within Adobe. I think the next step is to do some essentials video training today on the new 2024 suite of Adobe tools, and the new AI integrated features.
ChatGPT generated image descriptions.
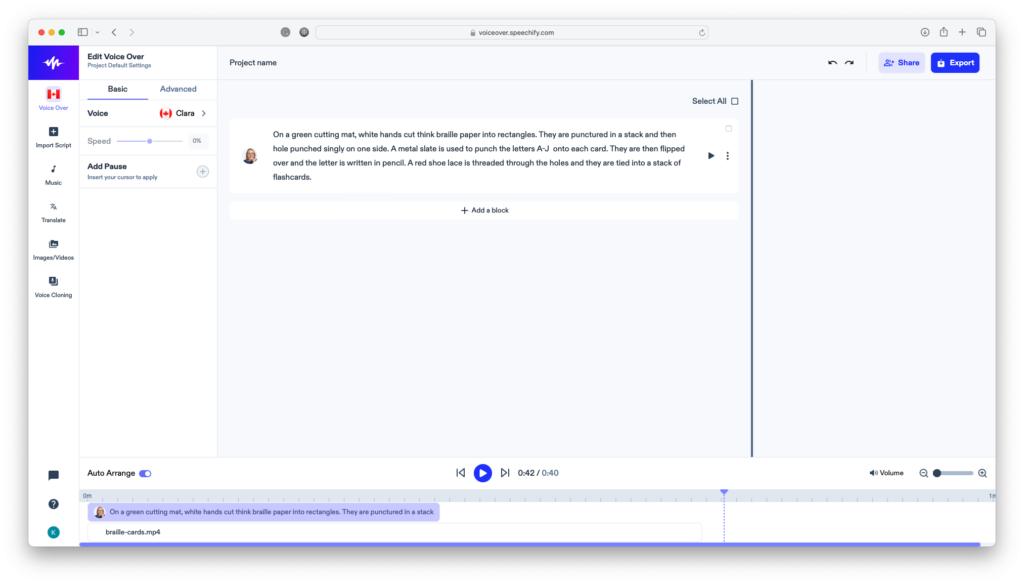
Speechify interface screenshot:
The screenshot depicts the user interface of Speechify’s voiceover studio tool.
Top Section:
- On the upper left corner, there’s a colorful wave-like logo (presumably the logo for Speechify).
- Adjacent to it, the tab is titled “Edit Voice Over” with a subtitle “Project Default Settings”.
- On the upper right corner, there are icons for settings, notifications, and user profile. There’s also a web address “voiceover.speechify.com” indicating the platform’s domain.
- Toward the right end, there are buttons for “Share” and “Export.”
Left Sidebar:
- A menu is presented vertically with various icons and labels. The highlighted tab is “Voice Over.”
- Other options available include: “Import Script,” “Music,” “Translate,” “Images/Videos,” and “Voice Cloning.”
Voice Over Panel (Left Central Section):
- This section seems to be focused on voice settings and controls:
- A toggle between “Basic” and “Advanced” at the top.
- Below that, there’s a “Voice” setting with the chosen voice labeled “Clara” accompanied by a speaker icon.
- There’s a slider control labeled “Speed” set to “0%”.
- An option labeled “Add Pause” is present, instructing the user to “Insert your cursor to apply.”
Main Central Section:
- A text box labeled “Project name” is at the top but is currently empty.
- Below that, there’s a field with the description: “On a green cutting mat, white hands cut thick braille paper into rectangles. They are punctured in a stack and then hole punched singly on one side. A metal slate is used to punch the letters A-J onto each card. They are then flipped over and the letter is written in pencil. A red shoe lace is threaded through the holes and they are tied into a stack of flashcards.”
- A button labeled “+ Add a block” is present below the text box.
Bottom Section:
- An “Auto Arrange” toggle switch.
- A timeline or playback control panel is displayed, with playback controls (play, pause) and a timer showing “0:42 / 0:40.”
- Below that, there’s a snippet from the text description being shown, and a file name “braille-cards.mp4” is visible.
Right Sidebar:
- Contains a narrow column with checkboxes, options to “Select All,” and vertical ellipses (indicating more options) associated with the given text blocks.
The overall interface looks modern, sleek, and user-friendly, with a predominantly white background and a mix of grays, blues, and colorful icons. The layout appears to offer a plethora of tools and functionalities for creating and editing voiceovers.
Otter.ai interface screenshot:
The screenshot displays the interface of the web-based transcription service, Otter.ai.
On the top-left corner, there’s a tab labeled “braille-cards-VO.”
The main content area is split into three sections:
- Left Section:
- There’s a summary section labeled “SUMMARY KEYWORDS” with keywords listed such as “cutting mat,” “shoelace,” “cut,” “paper,” “letter,” and “flipped.”
- Below this, a section titled “SPEAKERS” identifies “Speaker 1” as accounting for 100% of the speech.
- The transcript of what Speaker 1 said is then listed sequentially by timestamp. It seems to describe a time-lapse video where white hands are shown cutting thick braille paper into rectangles on a green cutting mat using a paper-cutting tool. The goal appears to be to maintain consistent cuts.
- Middle Section:
- At the top, there’s an “Export” heading.
- Below, there’s a segment that mentions there’s “No preview available for SRT.”
- There’s a section where users can select the file format for export, with “.srt” currently selected. There are also options to show speaker names and add line breaks automatically.
- The filename for the export appears to be “braille-cards-VO_otter.ai.srt.”
- Right Section:
- This section seems to be an overview or summary area. It’s titled “Otter Chat Summary.”
- It contains tabs for both “Otter Chat” and “Summary.”
- A note mentions, “This was a quick conversation! Summaries are generated for longer meetings.”
On the top-right corner, there are several icons, presumably for various functionalities, such as sharing the transcript.
The overall design is clean with a combination of light and dark gray elements, accented with blue. It appears to be a user-friendly interface for transcribing and managing audio recordings.
(Note: This description is based on the image provided and might not cover all elements of the Otter.ai interface.)
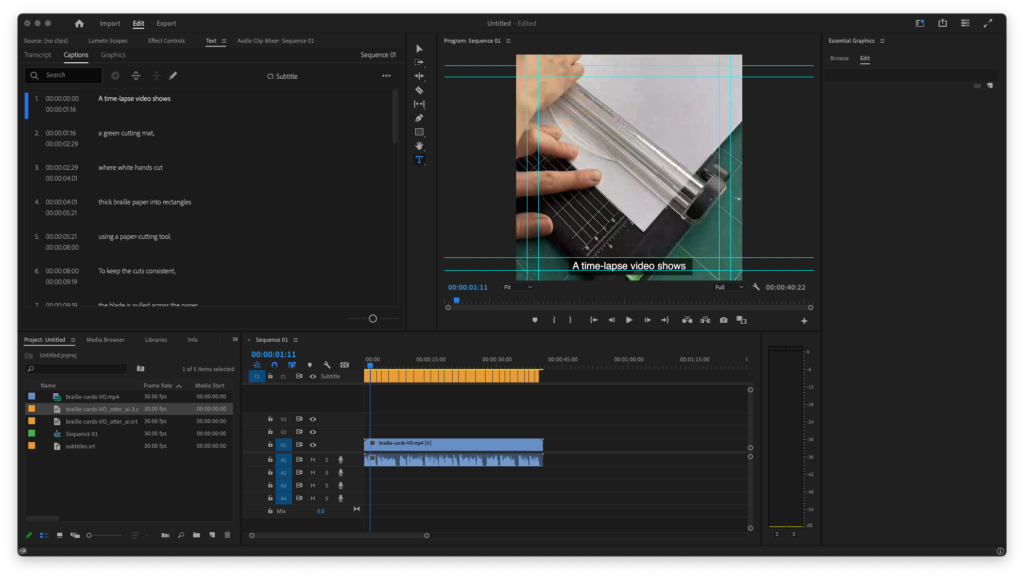
Adobe Premiere interface screenshot:
The screenshot displays the user interface of Adobe Premiere Pro, a popular video editing software.
Top Section:
- A series of tabs are visible: “Import,” “Edit,” “Export,” followed by sections like “Source,” “Lumetri Scopes,” “Effect Controls,” “Text,” “Audio Mixer: Sequence 01,” and “Transcript.”
- Next to “Transcript,” the tab “Captions” is highlighted, indicating the user is working in the captions panel.
- The user appears to have added captions, with entries like “A time-lapse video shows,” “a green cutting mat,” and “where white hands cut.”
- The active project is labeled “Untitled – Edited.”
- On the right side, there’s the “Essential Graphics” panel, currently on the “Browse” section.
Center Section:
- The “Program: Sequence 01” panel is visible, showcasing a frame from a video. The frame depicts a close-up of hands on a green cutting mat, holding a ruler-like tool over a white sheet.
- Superimposed on the video frame is a caption that reads: “A time-lapse video shows.”
- Below the video preview, playback controls (play, pause, skip, etc.) are available. There’s also a timecode display indicating “00:00:11.11” for the current frame.
Bottom Section:
- The “Project: Untitled” panel is on the left, showing media assets and sequences. The files “braille-cards-VO.mp4,” “braille-cards-VO_otter_al3.srt,” and “Subtitle.srt” among others are listed.
- To the right, the timeline panel labeled “Sequence 01” displays the video and audio tracks of the current project. It seems the user has added the “braille-cards-VO.mp4” video file to the timeline. This video track showcases waveforms, indicating the presence of audio. Above the video track, there’s an orange-colored sequence which might be the captions or a special effect applied.
- There’s a vertical toolbar to the left of the timeline with tools like the razor blade, hand, and text tools.
The overall interface is characterized by Adobe Premiere Pro’s dark theme, and the layout shows various panels and tools commonly used during the video editing process. The user seems to be working on adding captions to a video.